
CSDN:京晚8点--H5单页面手势滑屏效果实践

项目背景
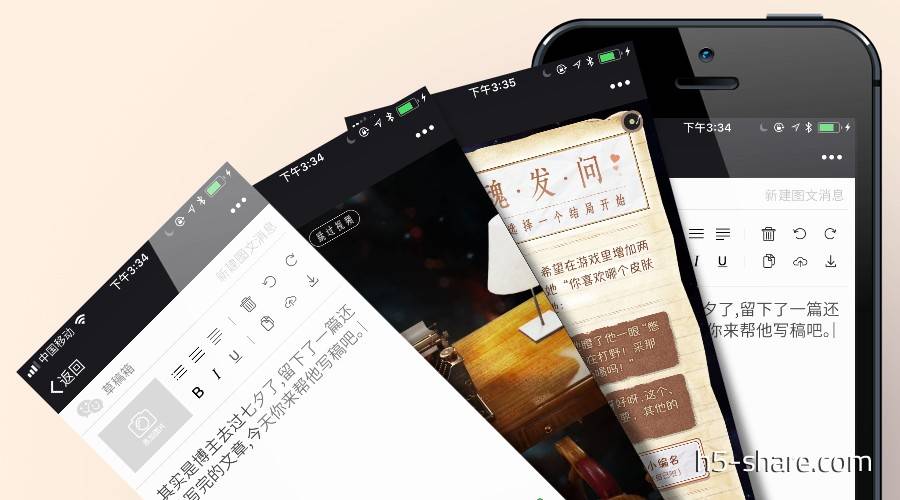
京晚8点作为内容平台重点打造的内容IP,通过优质的内容形式,潜移默化中让用户了解产品,建立对京东开始玩内容的心智和认知,目前这个项目已经迭代到第5期,最开始的时候我们的首页效果是一个卡片形式的时间轴,首页的背景大图会随着时间轴拖动到不同的卡片而进行切换:

从第5期开始,我们采用了一种全新的交互方式来给用户更好的体验反馈,那就是滑屏,可以先看一下效果:

要实现的滑屏效果
1、左右滑动可以切换背景图,同时在临界状态做出相应处理(滑动到第一张图片不能左滑,最后一张图片不能右滑)
2、滑动切换图片的时候带有覆盖的动效
为了实现上述需求,需要考虑三个问题:
对图片组应该采用何种形式的布局?
滑动切换时候如何实现覆盖动效?
如何处理临界状态以及临界延伸状态?
对图片组应该采用何种形式的布局
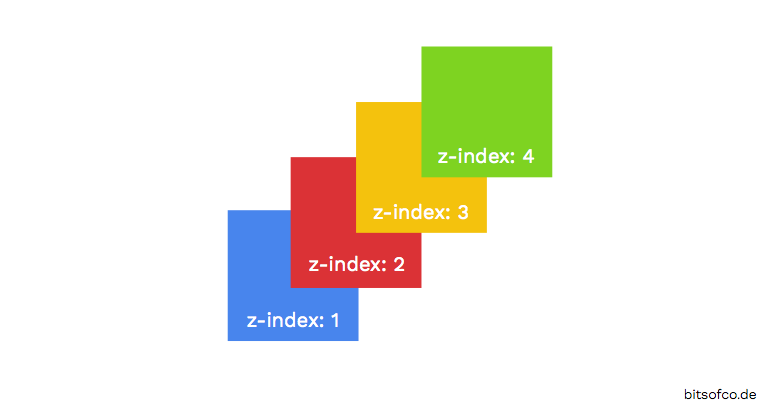
首先假设我们有一堆这样的背景图,要实现这种层叠的效果最简单的方式莫过于设置 z-index ,从右向左滑动的过程就像从一个卡牌组的最上方不断的抽取最上面那一张卡牌的过程,这样我们就可以使用position: absolute 结合z-index得到最基本的布局:
<template>
  <div class="card-list">
    <div
      class="card-wrapper"
      v-for="(item, index) in cardsList"
      :style="{zIndex: cardsList.length - index}"
    >
      <div
        class="card-img"
        :style="{backgroundImage: 'url('+ item +')'}"
      ></div>
    </div>
  </div>
</template>
<script>
  import bg1 from '../img/bg1.jpg'
  import bg2 from '../img/bg2.jpg'
  import bg3 from '../img/bg3.jpg'

  export default {
    data() {
      return {
        cardsList: [
          bg1,
          bg2,
          bg3
        ]
      }
    }
  }
</script>
滑动切换时候如何实现覆盖动效
滑动切换我们可以通过监听touch事件,计算手指滑动的位移,通过translate3d(x, y, z)去控制当前卡片在x轴上的位移,当从右向左滑的时候当前卡片向左移出屏幕,设置一个滑动的临界点,超出该临界点则判定滑动到下一张图,否则回到初始位置:
<template>
  <div class="card-list">
    <div
      class="card-wrapper"
      v-for="(item, index) in cardsList"
      :style="{zIndex: cardsList.length - index}"
      @touchstart="cardTouchStart"
      @touchmove="cardTouchMove"
      @touchend="cardTouchEnd"
    >
     // 省略部分dom布局
  </div>
</template>
<script>
  import bg1 from '../img/bg1.jpg'
  import bg2 from '../img/bg2.jpg'
  import bg3 from '../img/bg3.jpg'

  export default {
    data() {
      return {
        cardsList: [
          bg1,
          bg2,
          bg3
        ],
        // 使用一个touch对象存储一些属性,方便后续操作
        touch: {}
      }
    },
    methods: {
      cardTouchStart(e) {
        // touch事件初始化标志位
        this.touch.initiated = true
        // 开始滑动的x轴坐标
        this.touch.startX = e.touches[0].pageX
        // x轴方向上的滑动偏移量
        this.touch.deltaX = 0
      },
      cardTouchMove(e) {
        if (!this.touch.initiated) {
          return
        }
        // 滑动操作
      },
      cardTouchEnd(e) {
        // 重置标志位
        this.touch.initiated = false
      }
    }
  }
</script>
既然是通过translate3d进行位移变幻,我们还需要在恰当的时候初始化所有卡片的位置,这里默认初始化位置都是translate3d(0, 0, 0),同时当前卡片滑出屏幕外的最大位移应该刚好是屏幕宽度,这样当反向滑动的时候卡片也能立即回到屏幕可见区域,所以我们代码可以这么处理:
<script>
  import bg1 from '../img/bg1.jpg'
  import bg2 from '../img/bg2.jpg'
  import bg3 from '../img/bg3.jpg'
  const transform = 'transform'
  // 屏幕宽度
  let clientWidth

  export default {
    data() {
      return {
        cardsList: [
          bg1,
          bg2,
          bg3
        ],
        touch: {},
        nodeList: [],
        imgNodeList: [],
        selectIndex: 0
      }
    },
    created() {
      this.$nextTick(() => {
        clientWidth = document.documentElement.clientWidth
        // array-like-object转换成array
        this.nodeList = Array.from(document.getElementsByClassName('card-wrapper'))
        this.imgNodeList = Array.from(document.getElementsByClassName('card-img'))
        // 初始化卡片位置
        this.initCards()
      })
    },
    methods: {
      cardTouchStart(e) {
        // touch事件初始化标志位
        this.touch.initiated = true
        // 开始滑动的x轴坐标
        this.touch.startX = e.touches[0].pageX
        // x轴方向上的滑动偏移量
        this.touch.deltaX = 0
        // 确保卡片从初始化位置开始位移
        this.initCards()
      },
      cardTouchMove(e) {
        if (!this.touch.initiated) {
          return
        }
        // 滑动操作
      },
      cardTouchEnd(e) {
        // 重置标志位
        this.touch.initiated = false
      },
      initCards() {
        this.nodeList.forEach((item, index) => {
          if (index >= this.selectIndex) {
            item.style[transform] = `translate3d(0, 0, 0)`
            this.imgNodeList[index].style[transform] = `translate3d(0, 0, 0)`
          } else {
            item.style[transform] = `translate3d(-${clientWidth}px, 0, 0)`
            this.imgNodeList[index].style[transform] = `translate3d(${clientWidth}px, 0, 0)`
          }
        })
      }
    }
  }
</script>
关于 initCards方法这里有几点需要解释一下,首次京晚8点这个项目每一期都有好几个视频,同时每一天晚上8点都会准时更新一只视频,所以这里用一个变量selectIndex去标识今天应该切到哪一只视频,index小于selectIndex 的卡片就会移出到屏幕外,而index大于selectIndex的卡片则会由于我们设置了z-index的关系而不可见,其次,为了达到滑动时候下一张卡片覆盖当前卡片的效果,我们这里用了一个很巧妙的方式:
错位,也就是说当包裹卡片的div由于手指滑动而向左滑动出屏幕外的时候,我们控制卡片自身产生一个向右滑动同样距离的位移,这样就能给人看起来卡片没在动的假象,向右移动同理,上一个图直观的看一下:

通过代码来呈现这个效果:
// 省略不相干代码
 cardTouchMove(e) {
   if (!this.touch.initiated) {
     return
   }
   // 动态偏移量
   this.touch.deltaX = e.touches[0].pageX - this.touch.startX
   if (this.touch.deltaX >= 0) {
     // 向右滑动
   } else {
     // 向左滑动
   }
 },
// 省略不相干代码
以右滑为例给出大致处理过程:
  cardTouchMove(e) {
        if (!this.touch.initiated) {
          return
        }
        // 滑动操作
        // 动态偏移量
        this.touch.deltaX = e.touches[0].pageX - this.touch.startX
        this.touch.offset = -clientWidth + this.touch.deltaX
        if (this.touch.deltaX >= 0) {
          if (this.selectIndex === 0) {
            // 第一张,无法右滑
          } else {
            // 向右滑动
            this.nodeList[this.selectIndex].style[transform] = `translate3d(0, 0, 0)`
            this.imgNodeList[this.selectIndex].style[transform] = `translate3d(0, 0, 0)`
            // 上一张进入视野
            this.nodeList[this.selectIndex - 1].style[transform] = `translate3d(${this.touch.offset}px, 0, 0)`
            this.imgNodeList[this.selectIndex - 1].style[transform] = `translate3d(${-this.touch.offset}px, 0, 0)`
          }
        } else {
          // 向左滑动
        }
      },
      cardTouchEnd(e) {
        // 重置标志位
        this.touch.initiated = false
        if (this.touch.deltaX >= 0) {
          // 右滑
          if (this.selectIndex === 0) {
            // 第一张,无法右滑
          } else {
            this.nodeList[this.selectIndex - 1].style[transform] = `translate3d(0, 0, 0)`
            this.imgNodeList[this.selectIndex - 1].style[transform] = `translate3d(0, 0, 0)`
          }
        }
      }
看下初步效果已经出来了

如何处理临界状态以及临界延伸状态
上面其实处理过一种临界状态,就是当滑动到第一张或者最后一张的时候不做处理,还有一种临界延伸状态,假设我们这个时候手指从左向右滑动,并且我们此时滑过的宽度已经超过了屏幕的宽度,这个时候对用户来说体验最好的处理是继续拉出下一张卡片,同样用向右滑动给出处理的示例:
 // 向右滑动
 this.nodeList[this.selectIndex].style[transform] = `translate3d(0, 0, 0)`
 this.imgNodeList[this.selectIndex].style[transform] = `translate3d(0, 0, 0)`
 if (this.touch.offset < 0) {
   // 右滑位移还未超出一个屏幕宽度
   this.nodeList[this.selectIndex - 1].style[transform] = `translate3d(${this.touch.offset}px, 0, 0)`
   this.imgNodeList[this.selectIndex - 1].style[transform] = `translate3d(${-this.touch.offset}px, 0, 0)`
 } else {
   // 右滑位移超出了一个屏幕的宽度
   this.nodeList[this.selectIndex - 1].style[transform] = `translate3d(0, 0, 0)`
   this.imgNodeList[this.selectIndex - 1].style[transform] = `translate3d(0, 0, 0)`
   this.selectIndex -= 1
   this.touch.startX = e.touches[0].pageX
 }

可以看到无缝连续过渡的效果,还有一种需要处理的情况也是出于用户体验考虑,我们应该设置一个阈值,我这里设置的是屏幕宽度的20%,当用户滑动没有超过这个阈值的时候卡片回到原来位置,超过则滑动到下一张:
if (this.touch.deltaX < this.touch.threshold) {
      // 回到原点
    } else {
      // 执行滑动逻辑
    }
优化点
到目前为止上面的代码示例只是给出了最基本的效果,实际项目中卡片还用到了平滑过渡,这里推荐使用tween.js的ES6实现版本[es6-tween]
(https://github.com/tweenjs/es6-tween),另外,实际我们项目中处理触摸事件的时候有一点很重要的是处理多指滑动,这里提供一个比较靠谱的思路:通过官方TouchEvent API里面提供的changedTouches对象查找发生了变化的触点,通过对比这些触点的identifier属性去找到最开始触摸屏幕的那个触点,忽略其他触点的事件即可。
---------------------
作者:李牧羊
来源:CSDN
原文:https://blog.csdn.net/Wei_Smile/article/details/82120728
版权声明:本文为博主原创文章,转载请附上博文链接!
(转自CSDN的京晚8点--H5单页面手势滑屏效果实践,作者:李牧羊,链接:https://blog.csdn.net/Wei_Smile/article/details/82120728)
以上为“H5案例分享”团队转载文章,版权归原作者所有。
标签

关注微信号:h5-share,获取更多创意H5案例分享!也可访问H5案例分享网站www.h5anli.com,搜索查阅~

微信扫一扫
关注该公众号
 京公网安备 11010802030403号